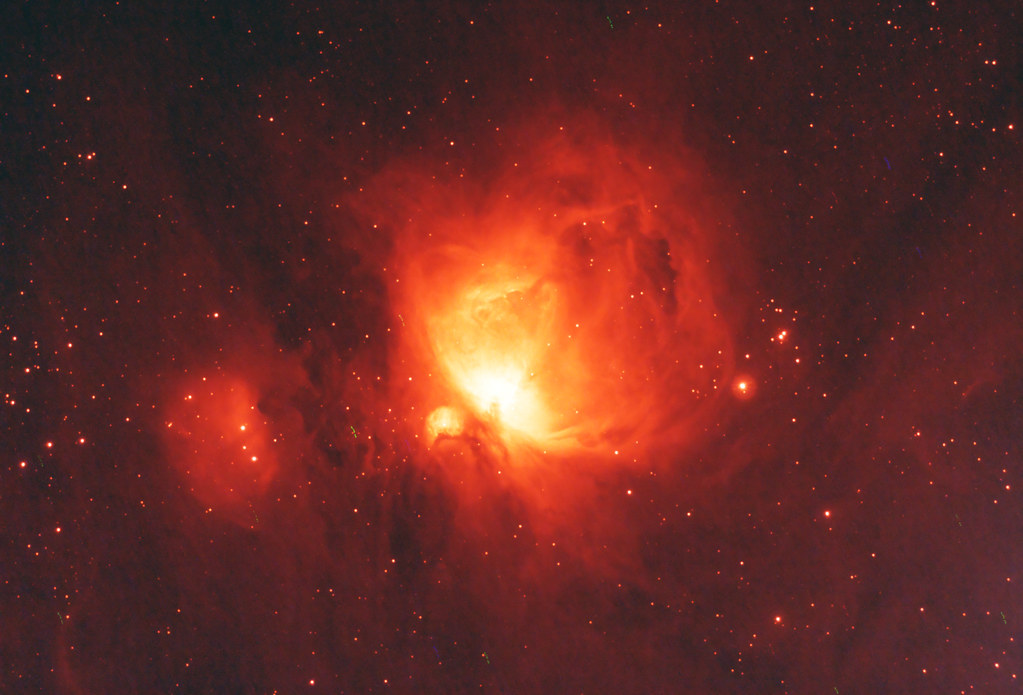
 Once I started playing around with the layer masks for the H-alpha images below I just couldn't stop. I had a pretty decent H-alpha luminance image, so all I needed was a good RGB image to combine. After digging through all the images I have taken in the past few months, I found some 10-second M42 images taken in October with the unmodified Rebel XT. Using the layer mask in Photoshop I combined the short exposure image with a 180-second image taken in December with the modified camera (both resulting from many exposures stacked & aligned of course). The images taken at different times were not quite lined up so the "translate, scale & rotate" function in ImagesPlus was needed. The resulting image was then split into red, blue and green channels. Then it was combined with the luminance H-alpha image below. Again, the images didn't quite line up and needed some alignment. Slowly but surely I am starting to get a handle on all this processing stuff.
Sunday, January 28, 2007
Fun with layer masks
Once I started playing around with the layer masks for the H-alpha images below I just couldn't stop. I had a pretty decent H-alpha luminance image, so all I needed was a good RGB image to combine. After digging through all the images I have taken in the past few months, I found some 10-second M42 images taken in October with the unmodified Rebel XT. Using the layer mask in Photoshop I combined the short exposure image with a 180-second image taken in December with the modified camera (both resulting from many exposures stacked & aligned of course). The images taken at different times were not quite lined up so the "translate, scale & rotate" function in ImagesPlus was needed. The resulting image was then split into red, blue and green channels. Then it was combined with the luminance H-alpha image below. Again, the images didn't quite line up and needed some alignment. Slowly but surely I am starting to get a handle on all this processing stuff.
Venturing into narrowband territory
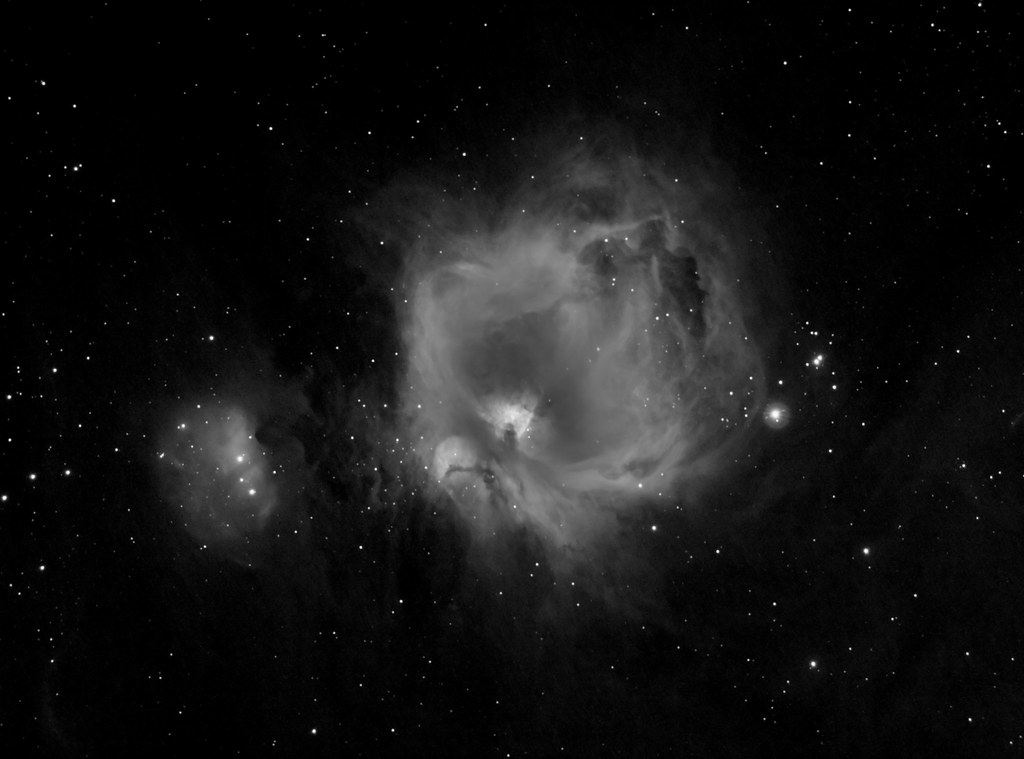
 What do you do when you have a modded DSLR camera, light-polluted skies, and a pretty bright moon? Stay inside taking infrared pictures of your pets? OK, sometimes I do that, but now I'm talking about narrowband imaging. This is a technique of using a filter with a very narrow bandpass. The idea here is to only image a certain wavelength of light, while rejecting all others (including all that pesky light pollution). On Friday night I was using a Baader 7nm H-alpha filter. The significance of the 7nm number is the width of the band of light that is allowed the pass. The smaller the number, the narrower the bandpass, and the more selective the filter. Smaller bandpass usually equals higher price, but the Baader is reasonably priced. You can see a plot of the light transmission here.
Some objects are rich in H-alpha light, others are not. Thus narrowband imaging is not suited for everything. But when it comes to really faint nebula, this works wonders in bringing out subtle details. I decided on imaging M42 because the entire Orion region is full of H-alpha emissions, and because Orion is well-placed in the sky after sunset this time of year. While logging my mount's tracking as described in the previous post, I took 30 exposures of 3-minutes each at ISO 1600. The result is pretty interesting, but I have much to learn about processing narrowband images. It's tricky because of everything being in the red channel. I still have more work to do on the above image, including layering in some shorter exposures to show some core detail of M42. But it's a good start and I am happy with it. I also have a Baader O-III filter that I will try sometime. One of these days I'll get a sulfur filter and have a full narrowband set for tri-color imaging. Should be fun!
UPDATE: Today I processed some 15-second exposures and did a layer mask in Photoshop to bring out more core detail. Below is the result with one using only the luminance channel and one using RGB.

Saturday, January 27, 2007
Measuring periodic error
Last night we had the first clear night on a weekend in about 6 weeks. The only bad thing about this time of year is that really clear nights usually mean really cold nights. This was no exception - quickly dropping to the 30's not long after sunset. Seeing was average, and transparency was above average. The waxing moon was a little over 50% illuminated. These are the times I like to use for experimentation. This night I decided that I needed to get some good data on the periodic error of my EQ6 mount. This brings up a couple of questions:
1. What the heck is periodic error?
2. Why do I want to spend time measuring it on a clear night?
For the first question, about all I can say is that periodic error has to do with the inaccuracy of the gears that move the mount in right ascension and declination. Gears made for mounts in my price range (i.e. cheap) just aren't made perfect. Actually, no gears are made perfect, but the more money you can spend on a mount, the more precision there is. The shape of the gear has a pattern to it which repeats on each revolution of the gear. Each revolution makes up one period. We measure the movement of the mount over several periods to get a picture of the error in the gear. Modern electronics can adapt to this error and help minimize it.
For the second question, I am measuring the periodic error because I will be sending my mount away in the near future to be treated with a new "dry-film" lubricant that is used by people like NASA to improve the mesh between load-bearing gears. Sounds like high-tech stuff, huh? It's a retired NASA engineer that has developed this service for amateur astronomers, and I have been selected as a beta tester. I'll never know if it improves anything unless I have data showing the performance before the treatment.
So, with a clear night at hand I lugged all my gear outside and tried to remember how everything hooks up. Funny how much you forget after 6 weeks of watching it rain every weekend. Once I got everything running, I pointed the mount at a star near the intersection of the celestial equator and my meridian, and fired up K3CCDTools. It was the first time for me using this software, and I had heard good things about it. After getting things lined up, I started a data log and walked away for a little bit. My mount's gear makes one revolution, or period, in 8 minutes. So, I wanted at least 3 periods to get good data. After that, I pointed the mount over to M42 and started some imaging. This time I used Metaguide since that is what I am comfortable with. K3CCDTools will also guide, but sitting outside in the cold is not the best time to learn something new, especially when you haven't even read the manual. With Metaguide ready to do some autoguiding, I started imaging M42 and went back inside to defrost my toes. Meanwhile, Metaguide was logging data while ImagesPlus was happily snapping away 3-minute exposures of M42.
By midnight I was ready for bed and carried my ice-cold equipment back in the house. This morning I imported the date into Excel and examined the results. Seems like my periodic error is 20 arcseconds from peak to peak. Pretty average for a mount in this price range, and about what I expected. The log file from Metaguide showed the error pattern over a longer time. It's interesting how every third wave in the error plot has a weird shape. It's not yet totally clear what all this means, but at least I have some baseline data upon which to make a comparison. Hopefully after my mount is modified, I can repeat this testing and see some improvement. Let's keep our fingers crossed!


Monday, January 15, 2007
A new toy!
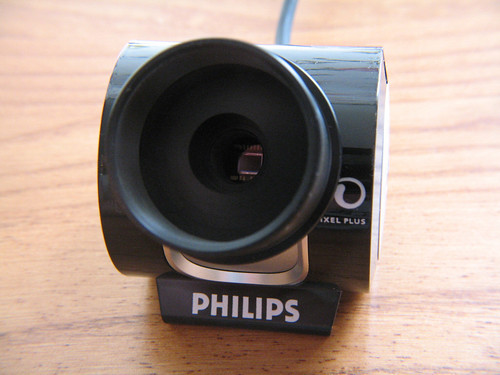 Over the weekend I headed over to Sam's Club and got myself one of these Philips SPC900NC webcams that I have heard so many great things about. For only $57 this is quite a good deal. You might ask "why does he need another camera?" Well, I didn't need it until I got the "AS" version DMK I talked about in the previous post. My DMK has been my autoguider when imaging with the Rebel XT. But, now that the DMK is capable of long-exposure imaging, I need something else to be my autoguiding camera. Hopefully the SPC900NC will be up to the task. To use the webcam with a telescope, an adapter is needed, which you can see in the picture. These are easy to find on Ebay, and the same seller made the adapter for my DMK camera.
 I can't wait to see how the SPC900NC performs, but I won't know until I get a clear night. The latest extended weather forecast is more depressing than the last time I checked. To top it all off, my wife and I are both suffering from bad colds right now. That's why I am sitting at home on a Monday instead of being at work. Now it's starting to rain a little - time to go read a book, or sleep!
Saturday, January 13, 2007
Time for some indoor projects...
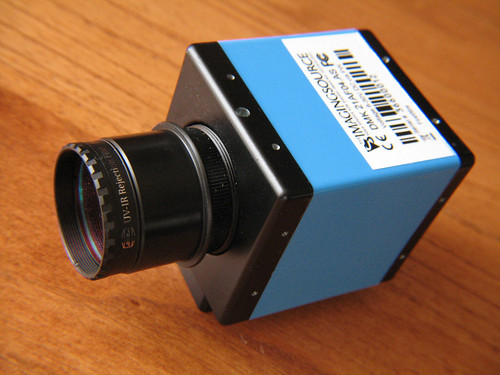 The weather continues to be uncooperative for imaging and doesn't appear to show any sign of giving me a break for the duration of the extended forecast. When the skies cloud over, astronomers usually focus on DIY projects, learning & research, catching up on sleep, drinking, or any combination thereof. I decided on a little DIY project to kick off the new year, along with some drinking thrown in there of course. I prefer single-malt Scotch, or anything with vodka in it. And an aged tawny port makes a nice nightcap too. What were we talking about? Oh yeah - my DIY project. This project requires some background information to explain why the heck I would build such a thing. It all started not long after I got my DMK21AF04 firewire camera from The Imaging Source. They make high frame-rate cameras for scientific, medical, and industrial applications. Fortunately for amateur astronomers like us, the cameras are also sensitive in low-light conditions. The high frame rate lets us capture better images of the planets too. The DMK has two uses for me: autoguiding and planetary imaging. I started off with autoguiding and discovered a problem - a bright stuck pixel, or possibly group of pixels, was really messing up my guiding sometimes since the software would try tracking the "false star" caused by the stuck pixel. The great folks at The Imaging Source were kind enough to arrange an exchange. About the same time, I had heard about a new version of the camera (with an "AS" suffix) was being developed for astronomy use. The new version would allow exposures up to 60 minutes. The original version I had would only go up to 30 seconds. Luckily enough, they replaced my DMK with the new "AS" version. This meant that I now had not only a great planetary imager and autoguiding camera, but also a long-exposure CCD camera for deep-space stuff too. All in one package!

Most of the higher-end CCD cameras are cooled, so I thought: why not give it a try on this one? I had most everything I needed already: some thermoelectric cooling modules (also called Peltier devices) and a CPU cooling fan. Now I just needed a "cold plate" - something to transfer heat away from what we want to be cold. I bought some aluminum square tube that had inside dimensions the same as the camera. It wasn't quite that easy and I ended up cutting off one side of the square to make things easier to file down to size. The thermoelectric cooler (from Melcor) was bonded to the CPU cooler heat sink, and then to the cold plate, using thermal epoxy. Some rubber sheet material from Hobby Lobby was placed between the heat sink and cold plate for insulation. The only remaining issue was the DC power for everything. The fan on the CPU cooler needed 12V and the thermoelectric cooler needed 5V. That turned out to be an easy one - I picked up a high-capacity computer power supply that was less than $20 after a big rebate. The final touch was some Molex connectors and I was ready for testing. I decided to use 5-minute exposures as a test. First, I let the DMK take about an hour's worth of 5-minute dark frames without the cooling module turned on. Then, I turned on the cooling module and let it take another hour of exposures. The results seem pretty good and I am anxious to get out and try this under some real imaging, if the weather ever clears out. Below is a comparison between the last uncooled exposure taken and the last cooled exposure taken. Noise is reduced and we are left with hot pixels and some sort of glow in the corner that I haven't figured out yet.

Sunday, January 7, 2007
Gotta love this weather!
 So far 2007 has not been good for my imaging. OK, I know it's only the first official weekend of the year but I am already complaining. Last weekend was cloudy and rainy - it poured rain like crazy on New Year's Eve. Then it cleared up just in time for the full moon, and of course in the middle of the week. I get up at 5AM for work, so week-night imaging is not an option for me. This weekend was another repeat, for the most part. After a rainy Friday, Saturday actually was very nice - partly sunny and 75. But as soon as the sun set, the temperature dropped like a rock and all that moisture starting rising. The image above pretty much sums up the way it looked every night this weekend. We just had a strong line of storms pass through which caused several tornado warnings in the area. That's twice this week! And again, the forecast for the week looks clear and sunny, with rain returning just in time for the weekend. Good thing I have lots of indoor projects to work on!
Sunday, December 31, 2006
Going deeper...
 After seeing many great images taken with modified Canon cameras, I finally got up enough courage to attempt one of these modifications myself. Of course I didn't want to try it on my new Rebel XT, which was still under warranty. I decided to pick up a refurbished model on Ebay, do the surgery on it, and sell my original camera which was only 3 months old.
 You may be wondering what I am talking about, and why I would want to rip apart a perfectly good camera. The stock Canon cameras have a small piece of filtered glass installed in front of the CMOS sensor (that's the part that converts red, green, and blue light into electrical signals). This filter cuts off a large portion of light in the H-alpha wavelength of 656nm. Above that wavelength the filter pretty much cuts off everything. Why do we care about H-alpha? Because hydrogen is very common in nebulae, and when hydrogen gets ionized due to the energy of a nearby power source such as a star, it then recombines with all the loose electrons flying around. About 1/2 of the time the hydrogen recombines at just the right energy level to release photons at the H-alpha wavelength. So, wherever a nebula is present we will usually see light (photons) emitted in H-alpha. Sure some nebulae are reflection types, but we can capture that light in the normal wavelengths too. Same goes for galaxies.
OK, enough physics, let's get back to the camera. So, we have this filtered glass deep inside the camera and we don't want it there. We have 3 options available right now to deal with this issue:
1. Remove the internal filter and leave the sensor uncovered.
2. Remove the internal filter and replace with clear glass.
3. Remove the internal filter and replace with UV/IR filtering glass.
The problem with option 1 is that the camera can no longer autofocus, but that's OK for use with a telescope, since the scope controls the focus. The only issue with #2 would be with refractor type telescopes where infrared light is not focused at the same point as visible light. This would cause stars to become bloated on images due to the excess IR energy that is out of focus. Option #3 is good for most average use, but does not allow the option of IR or UV photography. I chose option #2 because I wanted to try IR photography. While I do all my imaging through a refractor right now, I am not worried about star bloat because my light-pollution filter cuts off light in the infrared region.
For the clear glass replacement, I chose a pre-cut filter from Life Pixel. Edmund's Optics also sells a larger piece of anti-reflective glass that must be cut to the right size. The glass from Edmund's is thicker than the stock Canon filter, so I was worried about the effect on the camera's auto focus. Life Pixel did not specify a thickness, so I was hoping they matched the stock glass. When I got the glass I noticed it was thicker, so I could have saved some money by buying Edmund's glass. Oh well, now I know better.
 The actual surgery is quite tedious and involves many steps. Some good instructions can be found at Life Pixel's DIY page. I followed every step and nervously disassembled and then reassembled the camera. Well, I didn't completely put the case back together just in case anything was wrong. I put in the battery, nervously turned the power switch, and then....nothing. No power, nothing on the LCD screen, just...nothing. I was very frustrated at this point and decided to carefully disassemble the camera again and thoroughly check every connection as I put the camera back together. Again, I attempted to power up the camera and....again....nothing. Well, this time I was really frustrated. I decided to take a break and look over the online instructions on the Life Pixel site as well as this fine tutorial. While looking at one of the pictures it hit me - the door over the memory card slot! The camera won't power up without this door closed. Since I hadn't totally reassembled the camera, I did not close the card door. I ran back upstairs to try again, and lo and behold the camera powered up. Man, did I feel stupid at this point, but very relieved. The only thing left to do was secure all the tiny screws holding the case together, and then wait for a clear night.
 In the meantime I decided to try a few test shots indoors. At the top of this post you'll see a comparison image of some colored spools of thread. The top image has no external filter installed. You are seeing UV, visible, and IR wavelengths all at the same time. All color is washed out and you can see how sensitive the camera is to red. The second image shows how the CC1 filter from X-Nite brings back normal colors for whenever you want to take family or vacation photos, or whatever. This filter essentially mimics the stock Canon internal filter. You'll notice in that picture how much my auto focus is off. The thicker glass threw off the auto focus, but I can tweak that sometime. The lower picture shows the view through a Hoya R72 infrared filter. This gets tricky because you cannot see anything through the viewfinder with this filter installed. Your eye is not sensitive to IR, so it essentially looks black. To get the image framed and focused properly, you have to take a trial-and-error approach and take many images on a tripod. By the way, I am using 58mm filters along with a step-down ring to fit the 52mm threads on my lens.
 The weather cooperated the following weekend, with some unusually warm weather for mid-December. This also brought lots of fog. I decided to go out anyway and try out my newly modded camera. I started off taking about an hour's worth of "junk" images to get the camera up to operating temperature. Then I turned my telescope to Monoceros, a visually bleak constellation with some wonderful objects. My deepest image with the stock Rebel XT had been the Rosette Nebula, which you saw in the previous post. That was 80 exposure of 3 minutes each, stacked in ImagesPlus. This time I only tried 20 exposure of the same length for testing purposes. I was shocked at the stacked result. I got slightly better results in 1/4 of the exposure time. Other objects with less H-alpha emissions, or none at all, will not show this kind of improvement. But this short test proves the modification is well worth the effort for objects like the Rosette. A comparison image of the Rosette Nebula is at the bottom of this post. Next, I moved over to M42 and snapped only 20 images to check the results. The stacked image above shows a nice improvement in red sensitivity in this region. I then went over to the Horsehead Nebula area and planned to taking a lot of exposures here. After about 30 exposures were taken, I came back outside and noticed a thin layer of fog hanging over. I decided to stop the exposures and pack up for the night since it was getting late. I kept 26 of the exposures, although I should have threw out a few more due to the fog. The stacked result above blew me away. In just a short amount of time I had captured a huge amount of deep red H-alpha emissions. Just compare it to my first attempt in my previous post about Orion. The new image also indicates a problem that occurs when the mount is tracking too well. There are vertical lines appearing due to the noise from the camera's internal CMOS sensor, which is generated every time an image is read into memory. Normally a small amount of tracking error in the mount can compensate for this by shifting the image slightly between frames. Some people actually move the camera slightly between exposures. I never worried about this because my tracking was never perfect. That night I must have been lucky with my polar alignment!
 Since that night I have been busy with the holidays and haven't gotten a chance to get back out. I plan to spend a lot of time in Orion and Monoceros while they are in prime position for the next couple of months. Then it's galaxy season, which doesn't always required a modded camera, but it should be fun anyway. This post should get me caught up to present day, just in time for New Year's Day. Time to go celebrate the end of 2006, and the beginning of what hopefully is a great year for everyone.
Subscribe to:
Posts (Atom)