Friday, March 30, 2007

My EQ6 mount improvement - Part 2

Last time we were at the stage where the gears came out of the ultrasonic cleaner all nice an shiny. The next step is to take very precise measurements of the gears. One type of measurement performed is to measure the "run out" of the gear. This is done on a machine scale as shown below:

My gears averaged out less than 0.001" overall deviation. Pretty darn good! Next, the gears are checked on an optical comparator:

This device allows a very exact measurement so that the right amount of WS2 can be applied. Here's a view of the worm gear before treatment showing the roughness and machining marks:

After treatment you can see that everything looks much nicer:

After coating, a close-up inspection of the gear shows the WS2 coating as a light-colored edge on the teeth of the gears:

And here's a picture of the gears after coating. The WS2 is the darker area on the surfaces of the gears:

That's it for now. My mount is almost ready and should be back next week. Just in time for more cloudy weather!

Sunday, March 25, 2007

My EQ6 mount improvement - Part 1

This is the first part of I don't how many to describe the improvements being done to my EQ6 mount right now. The mount is currently getting worked on and I hope to have it back in the next week or so. In the meantime I have some pictures of the process that were sent to me by Tom at Astro Motion Technologies. This process is currently in beta test mode and I am one of the lucky beta testers.
The point of this process is to even out all the inaccuracies in the mounts internal gears and make them all mesh together much better. This will reduce periodic error and increase the load bearing ability of the gears. The secret of the process is the application of WS2, also known as Tungsten Disulphide. This is a compound developed by NASA as a lubricant for spacecraft. WS2 forms a molecular bond with whatever it is coating, but does not stick to itself so it won't build up where you don't want it. It has a very low coefficient of friction and can withstand pressures of over 300,000 psi. The coating is applied with high-velocity and is very thin - about 0.5 microns thick.

My EQ6, like other mounts of this type, move and track objects in two axis - right ascension (RA) and declination (DEC). Each axis has a worm gear, as shown in the worm block above. Each worm gear drives a larger gear along the axis of motion. The worm gears are driven by stepper motors controlled by the mounts internal electronics. The larger shaft gear, shown to the right of the mount, and the worm gear are the surfaces to be coated with WS2. The shaft gear has bearings inside that are friction-fit. They are pressed out using a hand press with even pressure, as shown below.

Once the gears and bearings have been completely removed, they are given a good cleaning in an ultrasonic cleaner. Thankfully Synta has stopped using the super-thick black grease that has always caused sticky operation in cold weather. They put that thick grease in there to make up for less-than-accurate gear tolerances. Back to the process - the gears come out of the ultrasonic cleaner all nice and shiny:

The worm gear is then measured on a machine gauge to check run out, radial run out, and gear tooth spacing. My gears checked out pretty good, with accuracies down to around a thousandth of an inch variance. Looks like Synta is doing pretty good with their gears. After the gears are measured, they are closely inspected on an optical comparator. But, more on that next time.

Thursday, March 22, 2007

A new project...

Things are kind of slow around here while my mount is still away (I promise to post lots about this soon!). So, it's time for a little indoor project that I have been thinking about for a while now. I wanted a "hands-off" focus control for my telescope, something I wouldn't have to touch which causes vibrations. I also wanted a way to return to a known point of focus, which is important whenever you change cameras or add a reducer or barlow. Every time you change something the focuser must be moved to reach focus again. This becomes more of an issue with a Schmidt-Cassegrain telescope because the focus knob, which moves the primary mirror, can be turned about a million times without any indication of where you are (or more correctly - where the mirror is at). My other focusers don't move so much, and have a scale engraved on them which helps me find the right focus. (NOTE: my Celestron C8 has a built-in focuser - the one I am talking about now - but I also have an additional Crayford focuser on the C8 for fine focusing, as well as a similar Crayford focuser on my ZS80FD) Touching any of the focusers causes vibrations in the entire rig, not to mention the fact I have to get up out of my chair. After researching around the Internet, I decided that a stepper motor with electronic control was easy enough for me to build, and affordable. I got most of my inspiration from this site. The stepper motor kit shown on that site is no longer available, so I found another kit here. It's not quite the same, so we will see how it works out.

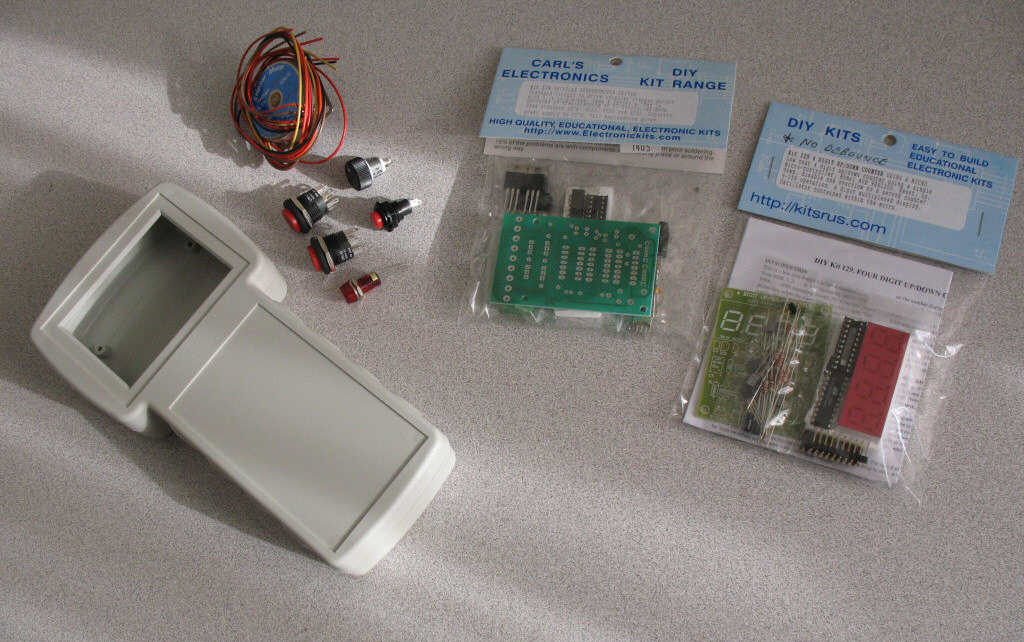
Above are the parts I have purchased so far, mostly from Mouser Electronics. The display/counter kit was purchased from Ozitronics down in Australia. If you contact Frank there, he will program the circuit for no debounce, which is important for the operation of the focus control system.

Here's the schematics of the stepper driver kit, and counter/display kit. I chose kits instead of building from scratch because it saves loads of time. I am still trying to figure out the best way to interface these two circuits, but it shouldn't be too hard.

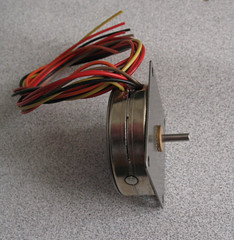
Here's a couple view of the stepper motor. It's a 12VDC motor with 100 steps per revolution. I actually bought two just in case (they are cheap!). To attach the motor to the focuser, I'll use a mechanical coupler like this:

Beyond that, a bracket will need to be fabricated to secure the motor assembly to the focuser. I still haven't figured that out yet. I hope to get started on this project soon. If this works well I will put stepper motors on everything for the ultimate lazy-man's setup. Later I will take it another step by making everything computer-controlled. My ultimate goal is to eventually control everything remotely from inside. Or am I getting too lazy? Hmmm...

Sunday, March 4, 2007

Chasing Iridium Flares

While my mount is away getting worked on (more on that later) I am looking for other things to image. Iridium flares are something I try to catch visually when I can, but I haven't tried to catch one with the DSLR. What are Iridium flares? They are reflections of sunlight off one of the 66 or so Iridium communications satellites orbiting all over the earth. They have large antenna arrays made of aluminum treated with silver-coated Teflon. Thus, they are highly reflective. The satellites are maintained at a fixed vertical position relative to the earth as they orbit, so if we know the position in orbit, we can use software to predict when and where we'll see the glint of sunlight off the antenna panels. You can check the next times for flares at the Heavens Above website. They require some careful planning to catch with a camera, so use a planetarium program to see where the satellite will be at the time of the flare. Even then you don't always get it right, as you can see by my image. I was a little low with the camera. Fortunately there's always another Iridium flare in the near future.

The Lunar Eclipse

Saturday night was the first total lunar eclipse in 2-1/2 years. Unfortunately for us the moon was rising well past the beginning of totality. That's the phase where the earth's shadow completely covers the moon and the moon turns a blood-red color. In this case the totality phase began at 5:44PM, but the moon wasn't going to rise until 6:21PM at my location. With the hills and trees on my eastern horizon, I would have to wait much later to even see anything. Totality ended at 6:58PM, at which time the moon was still hidden behind the trees. That's when I could see the bright crescent as the earth's shadow began moving off the moon. I sat with my telescope ready, positioned just above the tree line. The high clouds that were around all day were breaking up, but still making the view of the moon pretty fuzzy. Once the moon cleared the trees, I snapped a few shots but they were all fuzzy. The above image is my favorite of the bunch. Too bad we didn't have a good view of the entire eclipse. I haven't had good weather to see that since May of 2003, when I took the sequence of images below. At that time I didn't have a telescope, but the awesome lens on my old Sony DSC-F505V provided some great images. I'll be looking forward to nearly a year from now when we have our next total lunar eclipse on February 21, 2008.