I had a couple of other new "toys" - the Atik manual filter wheel and a Televue 2X barlow. I also picked up a C-mount to T-thread adapter to mount my DMK21AF04.AS camera to the male T-threads of the filter wheel. The other side of the filter wheel uses a T-thread to 1.25" nosepiece adapter.
I started out by slewing to a medium brightness star and checking focus using Metaguide. I've used Metaguide a lot for autoguiding, but one feature I really like is the FWHM measurement. That gives me a quick way of dialing in the right focus without messing around with a mask or any other focusing aids.
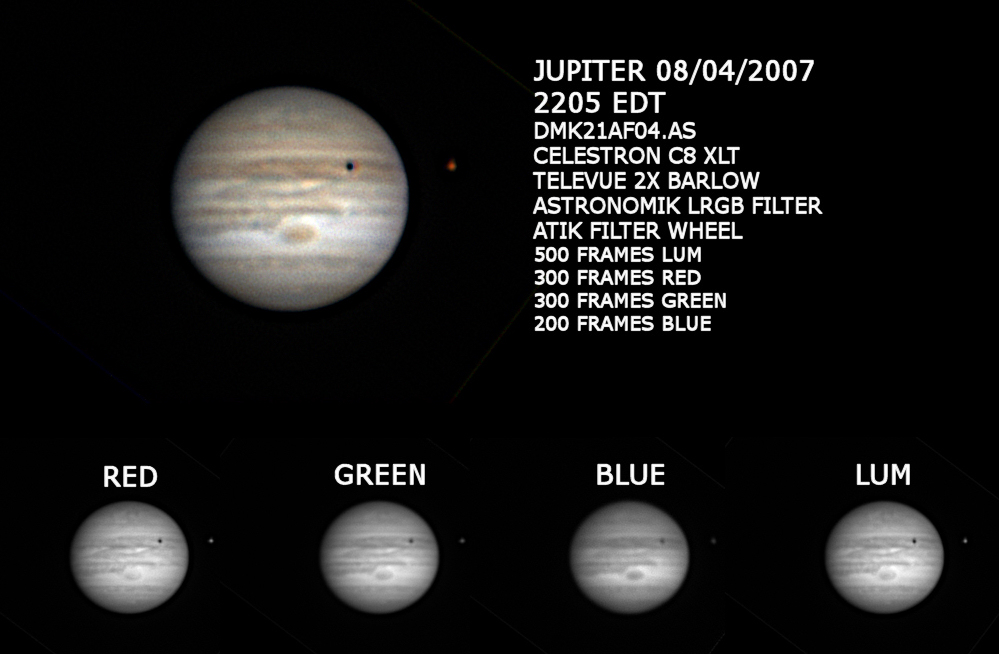
Once centered on Jupiter I fired up IC Capture and adjusted for the right exposure. I should have taken some screen shots here, but what I did was open up the histogram and adjust the exposure & gain settings to get the maximum spread of the histogram with each filter. The luminance filter required a shorter exposure and less gain while the color filters needed longer exposures. The blue filter took the longest exposure and as expected, due to atmospheric turbulence, it produced the worst quality image. The atmosphere affect the longer wavelengths more than the red (shorter) wavelengths. I only took no more than one minute of each color and luminance at 15 fps. Jupiter rotates very fast, so you must move quick. I was pleasantly surprised to find Io transiting across Jupiter's disk when I got started. The moon Io is similar in size to our own moon. I took a couple of quick LRGB sequences and worked on the results in Registax. The resulting images were saved in TIFF format, then some minor adjustments were made in Photoshop. I then used ImagesPlus to align the images and combine as a LRGB image. Here's the result which also shows the separate channels:
I am very happy with the result, especially since I really don't know what I am doing with Registax, and have only been at this for less than one year. I still have a lot to learn but I am enjoying it and taking things slowly.
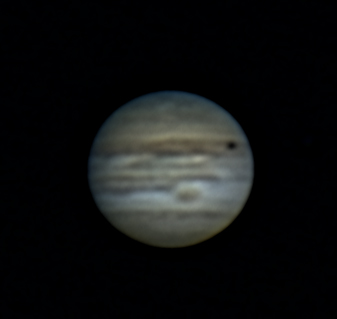
After taking some AVI's with the DMK camera, I decided to pop in the SPC900NC webcam before Io was gone to make a quick comparison. I took a few one-minute videos and tried my best to squeeze out some detail in Registax. This is the best I could get, and it's definitely not even close to the quality of the DMK:
Now I need to find a good home for the SPC900NC. It doesn't look like it will see much use anymore.
3 comments:
Hi Tim, great job on your latest Jupiter images. I can see the difference in the DMK vs DBK. My DBK does a little better than my ToUcam 840K. The DMK with the filter wheel does a nice job. I plan to get a DMK and filter wheel setup soon after I start my new job. Keep up the good work, Great Job!
Clear Skies
Tracey
Glad the DMK21AF04.AS worked out for you. I especially appreciated the comparison shot made with the SPC900.
I *almost* went the SPC900 route, but if you take a look at my blog post http://sflba.blogspot.com/2007/09/blessings-in-disguise-webcam-and-os.html
you'll see why I didn't. I'm glad it worked out that way, and am looking forward to getting the DMK camera soon. Just need to sell some junk first...
Hi. I have another question regarding your DMK camera. Have you used it to image any DSOs?
BTW, I also have an Orion Altas EQ-G. I've had it for about a year now. It has proven to be a great mount for the price. Have you checked out the EQMOD software for mount control without the hand controler?
-Rob
Post a Comment