Friday, July 4, 2008

Happy July 4th!

While the weather is hot and dry outside and my brown yard continues to get browner, we worked in the cool basement and finished the ceiling. It's a good feeling to have that done. Today we cut and installed all the border panels around the perimeter of the room. While I cut each piece, my wife installed them in the grid. The pieces that border the wall can be rather time consuming to cut due to the recessed edge on these type panels. The recessed edge gives more of a three-dimensional look to the panels and is much more stylish than the typical office type panels that sit flush with the grid. Each border panel must be cut by hand and it takes 3 cuts to make the recessed edge (6 cuts on each corner panel). Needless to say, after hand cutting 36 border panels in 3 hours my hand is hurting.
This first photo looks down the room towards the doors that lead into my workshop. I left a panel out where the old light fixture is mounted. I've ordered three 2' x 2' fluorescent fixtures that will be mounted down the center line of the ceiling. Then I will install about 8 can lights around the perimeter.
Suspended Ceiling


Here's a view looking back the other way down the room.
Suspended Ceiling


And another one..
Suspended Ceiling


Last one...
Suspended Ceiling

Thursday, July 3, 2008

More basement work

Today I took a day off work to have some extra time to finish up the suspended ceiling over the long holiday weekend. Turns out that I really didn't need all that time. In less than 4 hours this morning I had all the grid installed and all the panels placed except for the perimeter panels that need trimmed. The Armstrong ceiling system is very easy to install as long as you take careful measurements and plan everything ahead. Once you have the first few pieces of grid squared up, the remaining pieces literally snap together in minutes. It also helped a lot that my wife was handing me the grid pieces as I installed them.
Here's a photo of the grid in progress, nearly complete at this point:
Suspended Ceiling 1


Here I am snugging up the wires that support the main beams. This room has three main beams running the length of the room (25-1/2 feet) and they serve as the backbone of the entire ceiling.
Suspended Ceiling 2


This photo is how it looks like now. I could have spent the rest of the day cutting the perimeter panels but yard work needed to get done this afternoon.
Suspended Ceiling 3


Tomorrow I will finish up the ceiling and maybe we can actually sit back and enjoy the rest of the weekend.

Sunday, June 29, 2008

What have I been doing lately....continued

This weekend I made some great progress on the basement and am happy to report that the home theater ceiling is done. My plan for a simple perimeter of Armstrong ceiling tiles around a curved tray ceiling turned out to be much more work than I thought. Part of that difficulty was due to this being my first experience with any sort of suspended ceiling system. Once I got the hang of it, it wasn't so bad. Then I put some crown molding on the inner edges of the two long sides of the tray ceiling with rope lighting hidden behind. This should cast some soft light up on the curved ceiling for a subdued lighting effect when watching movies.
This first photo is looking down the room from where the TV will be placed. On both sides you can see the in-wall speakers for surround sound, as well as the sconce lights from Ikea. The ugly door will be repainted another color, or possibly replaced.
Basement


This next photo looks down the opposite direction and shows where the TV & entertainment center will be placed. The opening is sized just right for our existing entertainment center, which will sit flush with the wall for a built-in effect. You can see the access from behind via the small closet under the stairs.
Basement


Here's a closer look at a little area on the right side of the home theater room. The basement wall has this small inset area under the front porch. We decided to add some storage with the two large Ikea cabinets below, and "day bed" type area above it where we can take a nap, read a book, or whatever.
Basement


Over on the other side of the basement is a larger room which will become my wife's sewing & crafts room. This room is over 25 feet long, so it has plenty of room for all her fabric. The perimeter wall molding is installed for the suspended ceiling. Next weekend I plan to finish this ceiling - thanks to the longer holiday weekend.
Basement


Here's another view of the sewing room looking in the opposite direction. The double doors at the back lead to my workshop, which is pretty much complete except for the suspended ceiling (See other blog post here). The small door you can barely see at the back right side is the access to the closet under the stairs. The two French doors you see leaning against the wall will be mounted in the passageway between the home theater and the sewing room. These will be mounted on a sliding rail system in a bypass door configuration.
Basement


Assuming I get the ceiling completed next weekend, we will go out to purchase the flooring the next weekend. We are looking at an engineered bamboo that can be used in a floating floor installation. If all goes well we will have the floor installed by the end of July. After that, I estimate 2-3 weekends of work to connect the main electric service, install all the outlets & switches, and install the remaining lighting. Our goal of completion by the end of summer looks very attainable at this point.

Sunday, June 15, 2008

What have I been doing lately?

I've been working pretty much every weekend on my basement with a goal to complete everything before summer is over. A lot of progress has been made lately, and a lot of money has been spent. My astro equipment has sat idle for many months but I hope to get back into it once the basement work is finished. I'll post more progress photos and details sometime. Here is a shot taken today of the home theater room:


Basement 06_15_08


Painting is 99% complete with just a little touch-up required here and there. The ceiling will be the next part to complete, then the wood floor. Electric service is still pretty limited in the basement but I plan to connect the basement subpanel to the main service panel in the coming weeks. That's all for now...

P.S. - I also keep busy taking product shots of my wife's handmade bags, wallets, & pouches for her Etsy shop. Check it out here.

Friday, March 28, 2008

Spring is here!!

The weather still has not cooperated for astronomy, but at least spring is finally here. After a beautiful week of sunny skies and warm temps, this weekend will be full of cloudy skies and cool temps. Makes me wish I still had the dob again for quick setups on week nights when I can't stay up too late. It's now been over five months without touching my scope! But I haven't been wasting my time. I've gotten a lot more work done on my basement (Tim's Basement Blog) and there's another blog that needs updating. And I have been getting more interested in regular photography after acquiring a Canon 30D in January and picking up a few more lenses. I am actually (gasp) enjoying photography more than astronomy.
Here's a few photos of springs first flowers:


_MG_0100


_MG_0098


_MG_0097


_MG_0102


_MG_0614


_MG_0615


_MG_0616


_MG_0622


_MG_0624


_MG_0625


_MG_0626

Tuesday, December 25, 2007

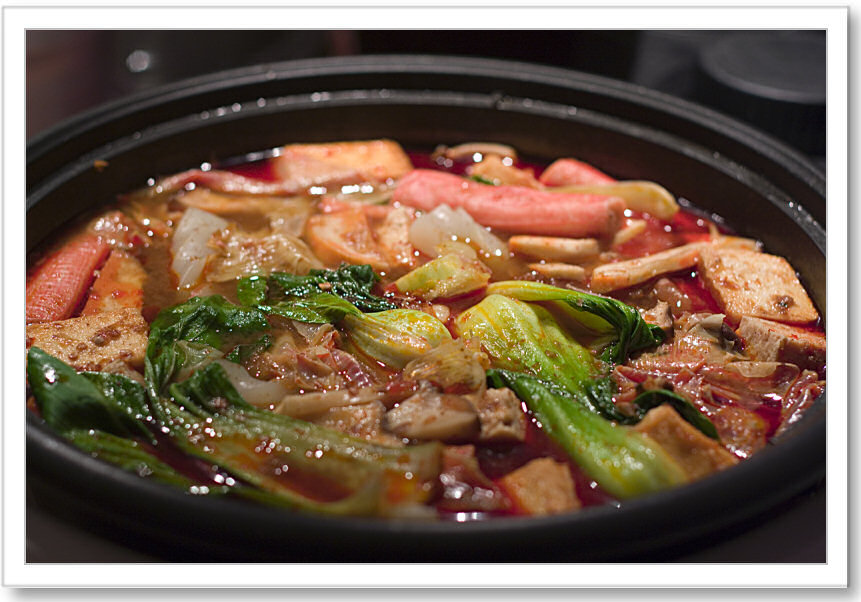
Spicy Hot Pot

When the weather turns colder nothing warms you from the inside like a big bubbling pot of fiery broth loaded up with meat, veggies, and whatever else you want. This is not a dish for the 100-degree summers of Georgia - it is best enjoyed on a cold winter's evening. The broth is made up of a store-bought hot pot soup base and either water or chicken stock for flavor. In this case we chose a Taiwanese soup base in a jar. Some beef tendon was pre-cooked in the hot pot base using a pressure cooker to soften the tough connective tissue. When cooked for a long time, beef tendon takes on a wonderful gelatinous texture and absorbs the rich flavor of the broth.
The hot pot ingredients can be quite varied and up to your own particular tastes. Usually there's thinly-sliced meat and/or seafood, vegetables, tofu, and tofu skin at a minimum. The great thing about hot pot is you can have whatever you like. On the side there's usually a sauce into which you can dip the cooked bits of stuff. My favorite is sa-cha sauce mixed with a raw egg yolk and a little soy sauce. The other sauce we like is a simple mixture of sliced scallions and vinegar. The vinegar sauce compliments pork very well, but I prefer the sa-cha sauce on everything else. I think I am a sa-cha junkie - I love it with stir-fried beef and I always use it to make a sauce for pan-fried dumplings.
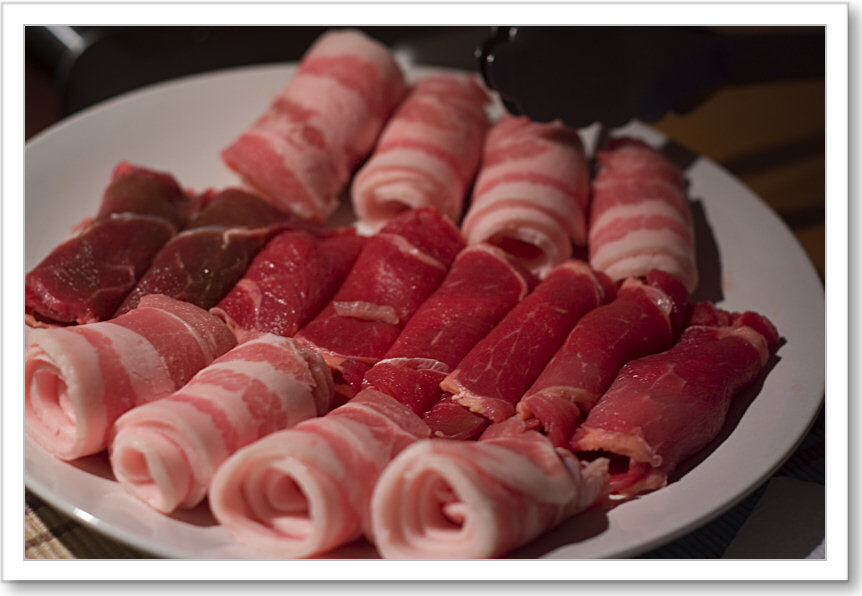
For our hot-pot meats, we took the easy route of buying pre-sliced pork belly and ribeye steak at the local Super H-Mart. The pork takes a little extra attention to make sure it's cooked properly, but the beef only needs 30 seconds or so to preserve it's tender texture. We try to load up heavy on the vegetables and this time we used sliced king oyster mushrooms, enoki mushrooms, brown & white beech mushrooms, and bok choy. We also added tofu that had been previously frozen. The freezing process changes the texture and creates some holes which allow the tofu to soak up the broth. Tofu skin, purchased as dry sheets, is another tasty item which softens up in the broth and soaks up lots of spiciness. Frozen fish cakes and imitation crab meat were added for some seafood flavor, although scallops would have been good too (but so expensive!). At the end of the meal we put in some tang-oh (Garland chrysanthemum - Chrysanthemum coronarium) which soaks up a lot of the spicy oil floating on top of the broth.
This is not a meal for everyone - you have to really love spicy food. This one burns coming and going! But you can always opt for a regular soup base and enjoy it just as well. After two days in a row of this spicy stuff, we are taking a break tonight with some Peking duck (more on that later).

Sunday, December 23, 2007

Pictures from the past

The weather here has been awful for astronomy or pretty much anything else you could do outdoors. To ward off cabin fever I have been digging through some older pictures and picking the ones I felt could be improved with a little processing.
Here's one from the not-too-distant past. It was taken in October of 2006 at Brasstown Bald, Georgia. This is the highest point in Georgia at 4,784 feet. At the time I had just started using my Rebel XT with the Canon 50mm f/1.8 II lens. These are berries on a mountain ash tree: